Basic White Bread

There are some recipes I think everyone should know.  How to make a couple loaves of white bread is one of them.  We make all of our own bread at home.

It is a basic food, a simple recipe, very easy to do.

I’ve had a couple requests from others asking that I teach them how to make it.  People have the idea that making bread is a difficult thing.  It isn’t!  The only hard part about making bread is waiting to eat it!

Picture 242

Gather your supplies! Bread flour, yeast, sugar, salt, oil, bowl, tbsp, tsp

Ingredients:

  • 5 cups bread flour
  • 2 cups warm water
  • 2 tbsp yeast
  • 2 tbsp sugar
  • 2 tbsp oil
  • 1-2 tsp salt

That’s it! That’s all you need!

Instructions:

  • Combine 2 cups of bread flour with two cups warm water, sugar, yeast, oil, and salt. (I always do it in that order.  I don’t know if it makes a difference or not.)
  • Let this set for 8 minutes to create a sponge.
Picture 842

Why is the first stage called a sponge? ‘Cause it looks all…ya know…spongy….and stuff.

  • Add the remaining 3 cups of flour
  • You can use a fork starting out until the dough is a little drier, then use your hands, then drop it onto the counter to knead it.  Use a little flour on the counter if it is sticky.
  • Knead it well and form a ball and place the ball back in the bowl.
Picture 843

Your dough should not be sticky when you’re done with it. Add a little flour to the counter as needed while you knead.

  • Wet a towel with warm water and ring it out to just damp and cover your bowl with it loosely.
  • Place it in a warm place and leave it set to rise an hour.
Picture 844

Dough should double in size. Mine was a little higher, but there was a dry spot on the towel and the dough stuck to it when I pulled it off. No worries though!

  • Punch the dough down, pull it out of the bowl, and beat on it some more– flour the counter if neccessary.
  • Knead it back into a ball as best you can and cut it in half.
Picture 846

The cut will become the bottom of each loaf

  • Place each half into non-stick or greased bread pans
  • Cover them again with a damp towel and leave them to rise 45 minutes to an hour.
Picture 848

Oven ready! I always leave them to set 45 minutes and then preheat the oven and pop them in when the oven is ready.

  • At the 45 minute mark, or toward the end of an hour, preheat the oven to 375 degrees.
  • Bake for 20- 25 minutes
  • Dump the bread from the pans onto a heat resistance surface to cool.

Picture 849

I had some technical difficulties that caused the bread to fall flat, but that’s o.k.  Trust me, it will eat just the same!

Salt controls the rate of rise, so if you find that your dough is rising too fast, growing too large, increase the salt from 1 tsp to 2.  If you use 2 tsp and find that your dough isn’t rising as well as you’d like, try 1 tsp or somewhere in between.

If your sponge doesn’t look so spongy I wouldn’t worry about it much.  I’ve had very spongy sponges and not so spongy sponges and at the end of the day the dough still rose, still smelled as good in the oven, and still tasted the same!

Because homemade bread doesn’t have a bunch of preservatives, it doesn’t keep that fresh chewy texture for long, unlike store bought that can sit on a counter for two weeks and still seem “fresh”.  It will only retain that freshness for a day or two.  It is edible for around a week, but not as enjoyable so you have a couple options IF you even have any bread left after 24 hours!  We do because homemade bread is the norm here so we are used to it and take it for granted.

You can toast it before eating OR you can cut it up into cubes and leave it spread on the counter to dry to make homemade stuffing which, by the way, is incredible!

Drying Herbs in my First Dehyrdator!

Well… O.k.  technically it’s my second dehydrator.  My first, I purchased for $5 at a yard sale, brought it home, plugged it in to test it out, and it overheated in minutes, and melted the bottom tray.  I was rather disappointed.

This time, I purchased one from the farm supply store in town.  There were a few choices.  One sold strictly as a jerky maker.  One was plastic meant to look like metal (at least that’s what I think they were going for) and had digital controls which I was quite attracted to, and a third similar in price to the second called “Garden Master”.

I chose the Garden Master.

It doesn’t look as neat, has a simple dial and off and on switch, but it’s made in the U.S.A.  … or mostly at least.  Close is better than not at all I suppose!

We’re big on that, by the way.  We always try to  either buy used from yard sales, antique stores, flea markets etc so that items get a second chance and our money goes to other regular people, or we check tags and purchase U.S.A. made products.

So this morning, the first thing I did was set the dehydrator up on the counter, then grabbed my basket to go harvest some of my herbs!

Picture 840

What’s growing out there, you ask?

Lemon Balm, Wild Mint, Horehound, Peppermint, Catnip, (yeah, heavy on the mint family I know!) Dill, Calendula, Yarrow, and some plant that I know I seeded, sprouted, and planted but have long since lost track of what in the world it is!  NO one that I have asked has been able to identify it either.

I’ve given up my wild mint and part of the horehound to the butterflies and bumblebees.

On a side note, I have only seen two or three honey bees….hm….

Once everything has dried (I harvested WAY more than would fit)  I am storing them in old bread making yeast jars for later use.  They are glass, moisture tight, and dark brown in color so the herbs will not be degraded by sunlight. Perfect!  I knew there was a reason I’ve been keeping them!

RIP, Bubba, the Blue Cochin Rooster

Picture 805It rarely ever fails.  If I have a bad dream about chickens, something goes wrong.

The last dream I had, I was walking in the yard and turned my head to see a trail of silvery feathers leading to a pile laying in the grass.  Sure enough….

A couple days ago, I went out to feed everyone breakfast.  All the birds were running from different directions so I didn’t see Bubba to notice if there was anything wrong.  I know there wasn’t the day before, except I saw him stumble a couple times.

It didn’t seem like such a big deal at the time.

As I was throwing feed, I felt something brush my leg and looked down to see Bubba.

I smiled and rolled my eyes.  Silly bird. He had tripped over his own feet surely.

Picture 761When I purchased him, he was missing the ends of some of his toes.  A friend told me it was from frost bite, and that that was why he always walked funny.  He did seem a little clumsy at times, and when he would run to me he would lope along alternating between a skip and a hop.

My grin quickly faded….
Bubba lifted himself enough to drag himself forward several steps and then died directly in front of me, at my feet, in an instant.

Poor guy…..

As much as I try to be no nonsense about chicken keeping, it’s hard not to get attached to at least some of them.

I’m happy at least that his death was swift and that he didn’t actually appear to be suffering prior to it.  I’m also happy that I could have given him a good home, however brief his stay here was, where he could wander and roam, picking bugs and greens, and just being a chicken.

Picture 827


Making Pickles, Important Note on the End!

ImageLast year was my first year canning and my first attempt at making pickles.  I didn’t get to do much experimenting, unfortunately.

Last year was also my first garden, and I didn’t take pest control very seriously so I had no preventative measures in place.  Not to mention I had not bothered to study up on pest identification until it was already too late.

It took no time at all before plant after plant succumbed to the hungry cucumber beetles and squash bugs.  I got zero pumpkins last year, and only a little over a canner load of cucumbers.

I made my one and only batch of pickles, and found them less than desirable, but had no more to experiment with.  We kept that semi sweet, very vinegary batch all the same though for the sake of “waste not, want not” and slowly but surely ate every jar.

This year, I was more prepared, and I planted various herbs known to draw predatory insects, used beer to attract slugs on other plants, and scattered Diatomaceous Earth over my various squash plants when I first noticed squash bugs and their eggs on the leaves of my precious butternut squash.

I have lost some squash plants, but not like last year.  I’ve had multiple canner loads of cucumbers, and they are still producing! Plenty to experiment with! 🙂

I used a very basic recipe last year that I found online for garlic dill pickles.

http://www.simplebites.net/pickles-101-recipe-garlic-dill-pickles/

You may want to try this before turning all mad scientist on your cucumbers.  I am, after all, quite flighty, and there is no telling if I forgot some simple, but important step.  I am the same person who made homemade pumpkin pie filling last year for Thanksgiving and forgot to put the sugar in one of the pumpkin mixtures.  Luckily, I was the first– and only– person who took a bite out of that pie!

So anyway, this was the recipe I used last year and the base I used for making my pickles this year.  I did a few things differently from this year and last though.  I used fresh dill, directly out of my garden, instead of buying dried dill at the store.  I upped the vinegar content and the salt content.

Also, last year I put the jars in a cabinet to pickle.  This year I put them in the refrigerator as soon as they were just warm to the touch.  If you’ll recall, the temperatures across the midwest were scorching last year, and since I am not a big fan of air conditioning, temperatures in the house weren’t exactly the best for pickling cucumbers.

Oh…and I added an ingredient. 😉

So far, so good this time around!  I did a taste test on my first jar of pickles yesterday!  It appears that whatever I didn’t get right last year, I did get right this year!

Making Pickles, Day One

You will need:

  • 1 cup CANNING salt
  • 8 lbs cucumbers
  • Water
  • 14 heads of dill, with stem

Instructions:

  • Gather up as many cucumbers as you can.  The recipe I linked to recommends about 8 pounds.
  • Wash the cucumbers, then poke them all over with a fork.
  • Place a layer of cucumbers in a bowl, layer over with salt, then another layer of cucumbers, then salt.
  • Fill the bowl with water until the water is about an inch over the cucumbers, and weight them down with a small plate.
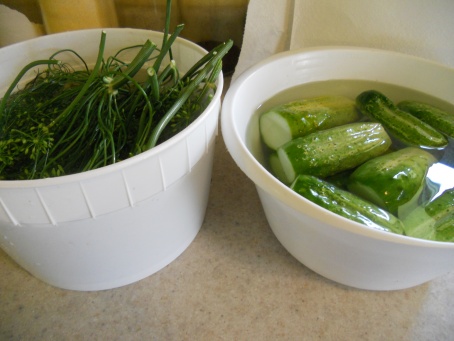
  • In another bowl, place your dill heads head down and fill with water overnight if you’re concerned with creepy crawlies being in or on them.  If you’re not, pick them and rinse them off on day two.  You should at least rinse them to get rid of any dust.
Image

Soak dill heads and cucumbers overnight

Canning is not hard.  The hardest part, or what is hard for me personally, is any kind of multi-tasking.  If you’re A.D.D. this may be a small, but easy to overcome hurdle for you as well.  I’ve had to learn to multi-task!

Day 2:

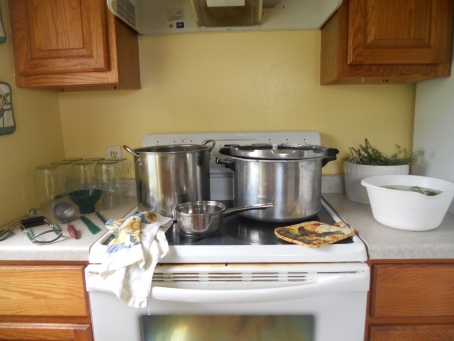
Your canning supplies

  • Gather your canning supplies– jars, seals, lids, canner, and all your utensils
  • Wash your jars in warm soapy water, check for cracks and chips along the rims
  • Rinse your seals and rings
  • Set everything up, nice and neat, and easily accessible.

Image

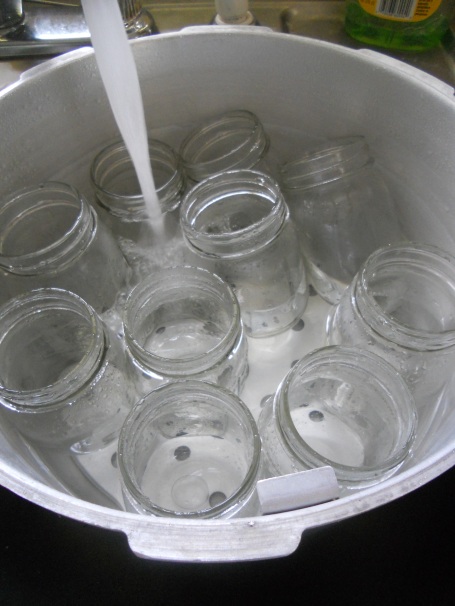
  • Place your jars in the canner and fill the canner to one inch over the top of the jars (fill the jars too to hold them in place) with water.  This will also get, and keep, the jars hot while you work.
  • Turn the burner on high
  • Place your seals and rings in a small saucepan with enough water to cover them.  Heat them on high til the water is hot and then turn it down to a simmer.

Ingredients

  • 21 cloves of garlic, each split in half
  • 35 peppercorns
  • 1/4 cup canning salt
  • 6 cups water
  • 6 cups vinegar
  • 1 or 2 Jalapenos
  • Dill heads
  • Brined cucumbers

Instructions:

  • Combine water, vinegar, and salt in a pot.
  • Heat to boiling, until salt is dissolved, and boil for 1 minute.
  • Turn the heat down to a simmer and cover the pot to avoid loss by evaporation
Image

Your canner with jars, seals and rings, and vinegar solution should all be heating up at once.

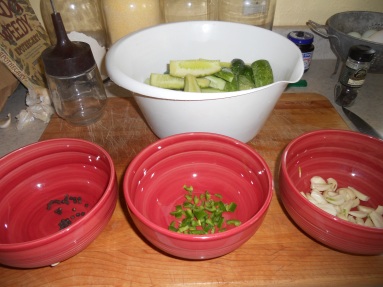
  • While you’re waiting for everything to heat up, start preparing your other ingredients.
  • Rinse your cucumbers of the brine and slice them in quarters.
  • Peel and slice your garlic cloves in half.
  • Slice your Jalapeno(s) in half, clean out the seeds, and slice them up.
  • Ready your peppercorns
Image

Brined cucumbers, peppercorns, jalapenos, and garlic all ready to go!

By now your pickling solution is good and hot, has been turned down to a simmer, and is covered.  Your seals and rings are simmering, and your canner is at least close to boiling!

  • Pull out a jar, dump the water from the jar in the sink and place 5 to 6 pieces of garlic,  4 or 5 peppercorns, and several pieces of Jalapenos in the bottom of the jar.
  • You can place the pieces of garlic in whole or dice them up.  If you dice, do it before you pull the jar out of the canner.
  • Grab a head of Dill, quickly cut off the seed heads and several small pieces of the stem, and throw them in the jar.  They fit better cut than if you throw it in whole.
  • Fill the jar with as many cucumber slices as you can.
  • Place your funnel on the jar, and ladle enough pickling solution to fill the jar to a 1/4 of an inch headspace.
  • Take your little plastic spatula and run it along the sides of the jar to work out air bubbles.
  • Place a seal on the jar and a ring.  Make the ring snug, but not tight.  It’s not a strong man contest.
  • Place the jar back in the canner and repeat these steps until you’re out of supplies/ your jars are full.
  • Let your canner come to a boil, cover, and boil 15 minutes.
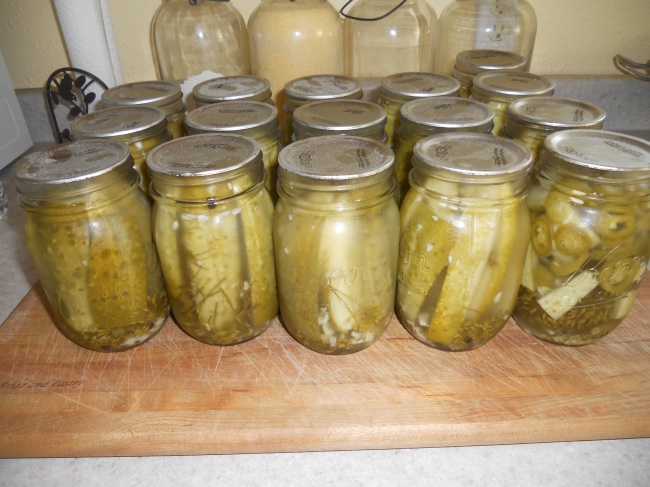
  • Remove the jars, listen for the ping of sealing lids, and let them cool for 12 to 24 hours and store in a cool place for at least a week.

My next batch of pickles, after the first as instructed above, is an even greater experiment.  I used a different recipe for the pickling solution, added a more generous amount of Jalapenos to the jar, and also added a ring of Aurora pepper to each, as well as a Bay leaf.  Hopefully they will be just as good and pickled as the others have turned out to be, but will be just a little on the hot side!  I’ll let you know how they turn out, and if they’re good, I’ll post the recipe!

NOTE:

  • If you’re using a pressure canner as a water bath canner, you will need to remove the over pressure plug from the canner lid before placing it on the canner.
  • I asked, and was advised, that after you’ve allowed your jars to pickle, you can move them from the refrigerator to a dark cabinet so they are not taking up space

Let’s Talk Chicken… and Why You SHOULDN’T Get Them.

Picture 456-crop In January of 2012, my family and I moved out of our little Southeast Missouri town and into an old farmhouse on 5 acres.   Once here, we made the decision to go self sufficient-ish.  So, in March of last year, I decided the first step toward independence from our country’s dangerous and unnatural, just in time food supply was to get some chickens!

I had no idea at the time that I would very quickly spiral into chicken fever!

What’s chicken fever?  Well, your math changes for one.  Here’s a couple lessons….

If you lose or sell one chicken, it must be replaced.  Therefore, you must purchase two or more as replacement for one.  All chickens count in this case when chicken math is applied– that includes chicks, cockerels,  pullets, and roosters.

In counting the number of chickens you have in your possession, only fully mature hens count.  You don’t count chicks, roosters, or pullets that haven’t started to lay, thus keeping your “official” flock numbers low and avoiding any suspicion by others that you might have chicken fever to begin with.

Chicken fever means you eat, sleep, and dream chickens.  And I really do.  I read the word “chicken” in place of other words.  “Google Chicken” instead of  “Google Chrome” for example.  I dream about them.  I’ve spent hours and hours in research on breeds, disease, genetics, you name it.  I belong to poultry groups on Facebook, where I spend waaay more time than I should, and act as an administrator on one.  I now travel 4 hours one way, three times a year, JUST to go to Missouri’s biggest chicken swap where we camp for two or three days.  And here at home? The birds rule all.  Everything revolves around them.

BUT….

Chickens aren’t for everyone.

http://www.nbcnews.com/health/backyard-chickens-dumped-shelters-when-hipsters-cant-cope-critics-say-6C10533508

It’s true.  When you start researching about getting chickens, you’ll see adorable coops, chickens on green grass, and all the benefits that go with keeping chickens– fresh eggs, organic eggs, insect and rodent control, and chickens are oh so easy to keep! Or mostly true….

Here’s what isn’t talked about or is only glossed over.

Ease of Care

Picture 562One, chickens ARE easy…. unless you happen to get a carrier illness in your flock.  That changes everything.  Your cost of operation skyrockets as you’re forced to medicate birds one or more times a year which also makes your eggs inedible for a period of time.  That’s if you choose to keep them.  Depending on the illness, the state you live in may advise that you put all of your birds down and start over again.

But even if you don’t get a carrier illness, chickens DO get sick sometimes, and finding out the cause and treatment can still be expensive.

While chickens are relatively easy to care for, they DO still require upkeep!  You can’t just throw them into a coop and run, feed them, and think that’s all there is to it.  They have to be wormed once or twice a year, checked regularly and treated for parasites such as mites and lice.  Their roosts have to be scraped, their litter cleaned out and changed one or more times a year.

They have to be let out every morning and cooped at night.  I realize that sounds like a pretty obvious given, but I have read from people before who were considering getting chickens and didn’t want to be bothered to step out twice a day to open and shut a door.

Costs

Chickens are fairly cheap compared to other livestock, but not even counting the cost of the coop, fencing for the run, and the chickens themselves,  feed and litter and what you put in your chicken medicine cabinet, dewormer and external parasite treatment, brooding equipment, electric to run heat lamps or light a coop in winter all cost money!

Aging Hens/ Roosters

Picture 827Hens don’t lay forever.  Most lay consistently for a couple years before the number of eggs you’ll get drops off to where keeping a hen and feeding her is no longer financially justifiable.  Eventually, many hens stop laying altogether.  If you are considering getting chickens, you need to consider this.  What is your plan of action when a hen no longer produces eggs if you are the type of person who is unable to drop them in a soup pot?  Will you keep the hen until she passes naturally two, three, four years or more after she stops laying and still purchase a replacement, or will you wait?  Will you put her up for sale, knowing she will likely become someone else’s dinner?

If you live in a city that doesn’t allow roosters, and you purchase straight run chicks what will you do if you come out with one or more roosters?  Roosters can be VERY difficult to get rid of, even when you just give them away!  Do you have a plan?

Your Run/ Free Ranging & Landscaping

Picture 700

All those photos of chickens picking through green grass?  Ha!

First of all, if you keep your chickens in a run of the recommended size for your number of birds, you can forget the pretty green grass.  Chicken poop is HOT.  Meaning it is high in nitrogen, and it burns plant life.  That pretty green grass will be done and gone in the first year, replaced by dirt and, when it rains, MUD.

My chickens free range on five acres, spend little time in their run, and yet they’ve still managed to leave a patch of dirt in front of their coop and a trail leading to the gate of the run!

Other issues involved with free ranging?  You can kiss your well manicured landscaping good-bye unless you go to great lengths to protect it.  Mulch?  They’ll scratch it up into the yard and all over your pathway.  Plants?  Uh huh.  Finding plants your chickens won’t eat may turn into a major battle.  Nearly every plant I have so far must be caged and screened to protect it until the time comes when the plant is too big for the chickens to pick to death.  They also like to scratch up the roots when you plant something new!

Our vegetable garden had to be fenced.  Despite the effort, an occasional chicken still gets in.  Chickens happen to love the color red.  Kiss any developing tomatoes goodbye if they find their way into your garden!

My chickens like to hang out on the front porch, and wait for me to come out with treats.  That means?

Poop.  All over my porch and all over the sidewalks, and the need to constantly spray everything down.

You do have the option of a movable run, called a chicken tractor, but if you’re someone who doesn’t want to be bothered changing water everyday or even opening and closing a door, this would not be an option for you either as you have to move the tractor every day.

Picture 613Oh, and if you have young children like I do,  and one of them likes to let the chickens in the house, you may occasionally walk into your kitchen to find a bird or two helping themselves to the cat food or just generally inspecting your living quarters, and if you ask them nicely to please leave, they will not be agreeable.  Rude!

I want to see a garden and chickens in every yard!!…. of those well informed and prepared and capable of taking care of their birds.

Some of us LIKE seeing chickens peeking through and crowing at open windows.  Some of us look at chicken poop and think, “This is going to be GREAT fertilizer for my garden.”  Some of us coo and baby talk our birds as we grunt and scrape and shovel  feces and bedding from our coops, and smile in adoration as our birds scratch up and kick the new bedding we just put down right back out of the coop.  We sternly chastise, then chuckle, when we find that our flocks have flung mulch or rocks everywhere, we’ve stepped in poop on our front porch, and they’ve picked every single petal off the rose bushes or eaten all the ripening tomatoes in our garden.

There are a lot of us who happily spend, scrape, grunt, shovel, growl and chastise.  You may be one of us too!  But if any of this sounds intolerable to you, and you cannot make a surefire plan in dealing with aging hens and unwanted roosters, raising chickens may not be for you.

Picture 596Chickens belong in a person’s chicken run or yard, and to some, on our plates! Whether you agree with that or not, where they DON’T belong is in animal shelters dependent on people’s donations to care for them! If you purchase them, they are YOUR responsibility! If you’re considering raising a backyard flock, please think carefully and have a plan first.